
Table of Contents
فوائد استخدام وصلة كابل Dable Lock لصندوق توصيل طرفية الكابل القابل للتقلص بالحرارة
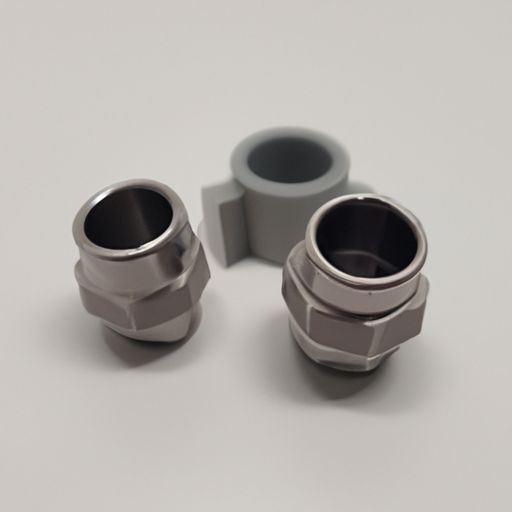
دليل التثبيت لوصلة كابل PG7 من النوع المقاوم للماء IP68
يعد تثبيت وصلة كابل القفل dable عملية مباشرة، ولكن من المهم اتباع الخطوات الصحيحة لضمان اتصال سليم وآمن. قبل البدء في عملية التثبيت، تأكد من أن لديك جميع الأدوات والمواد اللازمة في متناول اليد. ستحتاج إلى مفك براغي، وزوج من الكماشات، وبالطبع وصلة الكابل نفسها.
ابدأ بتحضير الكابل الذي ستقوم بتوصيله. قم بفك الغلاف الخارجي للكابل لكشف الأسلاك الفردية بالداخل. تأكد من ترك طول كافٍ من الأسلاك للعمل بها عند توصيلها بصندوق التوصيل الطرفي. بمجرد كشف الأسلاك، قم بلف الخيوط معًا لإنشاء اتصال متين.
بعد ذلك، أدخل الكابل من خلال وصلة الكابل، وتأكد من محاذاة الأسلاك بشكل صحيح مع صندوق التوصيل الطرفي. قم بربط السدادة حول الكابل باستخدام آلية القفل المتوفرة. سيؤدي هذا إلى إنشاء ختم آمن حول الكابل، مما يمنع أي رطوبة أو غبار من الدخول إلى الاتصال.
بمجرد تثبيت وصلة الكابل في مكانها بشكل آمن، من المهم اختبار الاتصال للتأكد من أنه يعمل بشكل صحيح. استخدم مقياسًا متعددًا للتحقق من الاستمرارية بين الأسلاك وصندوق التوصيل الطرفي. إذا كان الاتصال آمنًا، فمن المفترض أن ترى قراءة على المقياس المتعدد تشير إلى اكتمال الدائرة.
إذا كان كل شيء يعمل بشكل صحيح، فيمكنك الآن إغلاق وصلة الكابل لتوفير حماية إضافية ضد العناصر. ضع طبقة من أنابيب الانكماش الحراري حول الوصلة واستخدم مسدسًا حراريًا لتقليص الأنبوب في مكانه. سيؤدي هذا إلى إنشاء ختم مانع لتسرب الماء حول سدادة الكابل، مما يضمن حماية اتصالك من الرطوبة والعوامل البيئية الأخرى. غدة كابل موثوقة ومقاومة للماء. باتباع دليل التثبيت المذكور أعلاه، يمكنك التأكد من أن التوصيلات الكهربائية الخاصة بك آمنة ومحمية من العناصر. تذكر دائمًا اتباع تعليمات الشركة المصنعة عند تركيب أي مكونات كهربائية لضمان اتصال آمن وموثوق.
Installing the dable lock cable gland is a straightforward process, but it is important to follow the correct steps to ensure a proper and secure connection. Before you begin the installation process, make sure you have all the necessary tools and materials on hand. You will need a Screwdriver, a pair of pliers, and of course, the cable gland itself.
Start by preparing the cable that you will be connecting. Strip back the outer sheath of the cable to expose the individual wires inside. Make sure to leave enough length of the wires to work with when connecting them to the terminal junction box. Once the wires are exposed, twist the strands together to create a solid connection.
Next, insert the cable through the cable gland, making sure that the wires are properly aligned with the terminal junction box. Tighten the gland around the cable using the provided locking mechanism. This will create a secure seal around the cable, preventing any moisture or dust from entering the connection.
Once the cable gland is securely in place, it is important to test the connection to ensure that it is working properly. Use a multimeter to check for continuity between the wires and the terminal junction box. If the connection is secure, you should see a reading on the multimeter indicating that the circuit is complete.
If everything is working properly, you can now seal the cable gland to provide additional protection against the elements. Apply a layer of heat shrink tubing around the connection and use a heat gun to shrink the tubing in place. This will create a watertight seal around the cable gland, ensuring that your connection is protected from moisture and other environmental factors.
In conclusion, the dable lock cable gland for heat shrinkable cable terminal junction box is an excellent choice for those looking for a reliable and waterproof cable gland. By following the installation guide provided above, you can ensure that your electrical connections are secure and protected from the elements. Remember to always follow the manufacturer’s instructions when installing any electrical components to ensure a safe and reliable connection.
